Internet Explorer is no longer updated for Windows and may not work properly with MXstore.
Please upgrade it now to keep shopping for the latest dirt bike gear and accessories!
How To: Adjust and Lubricate your Motocross Chain

A motocross chain is the last moving part on your bike which is responsible for getting power from your engine to the ground resulting in all the fun things like going fast, clearing jumps, popping wheelies and roosting your mates! Like all moving bike parts on your bike, they wear over time and should be checked regularly to maintain optimum performance. They are quite easy to look after and considering the damage they can cause if it broke or slipped off, you would agree your chain definitely needs to be included in your regular maintenance routine!
Different Types of chains:
Most bikes come off the showroom floor with a regular heavy duty chain fitted. Like most stock parts they are strong, light, cheap to manufacture and will do their job without any dramas for many riding hours. When it’s time to replace your chain and sprockets (which should always be done at the same time) you will most likely be asked whether you want a standard heavy duty, O-ring or X-ring chain. If you haven’t heard of these before you probably won’t understand why there is a significant price difference between them, so we thought we would explain why..
Standard Heavy Duty: Is a regular motorcycle chain which has unsealed rollers which need to be cleaned and lubricated often. The downside to this type of chain is dirt and grit works its way inside the chain rollers on every ride which causes the chain to wear so frequent cleaning and re greasing of the chain is necessary to keep it in good shape.
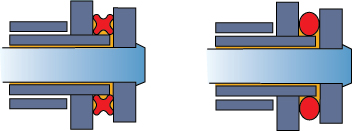
O-ring: This chain was designed with small O-rings sealing the rollers inner and outer plates. Before the factory rivets the chain together, the internal parts of the chain are vacuum injected with chain grease. With the rubber O-ring seal the dirt stays out and the grease stays inside every roller for the life of the chain.
Maintenance for this type of chain is very minimal as you no longer need to clean and degrease your chain then re lubricate, merely wash your motorcycle as per normal and spray with a waterproof lubricant spray afterwards. The only downside to this type of chain is it is thought that the nature of the rubber seal creates more friction and drag on your chain and slightly reduces the bikes power output.
X-ring: The next step up from an O-ring chain, the X-ring relates to the shape of the ring. Instead of the O shape it has an X shape. This creates 2 sealing points per side which creates a better seal and causes less drag which means less power loss. The down side of this is they are more expensive than the other two types of chains!
Why Maintain Your Chain? :
As a chain wears it stretches which if left too long will cause premature wear and tear on your sprockets. Basically like your gear box your chain and sprockets are moving parts, the more out of sync they are the more friction is created. The more friction you have, the more power you lose!
Apart from this, you will go through sprockets quicker which costs you money, and if a chain snaps it can be fed straight into the back of your gear box which can smash your engine cases or worse, jam the rear wheel at high speeds or on a jump face causing all sorts of dramas!
Any time you replace a chain you should replace your sprockets, as they are interlocking they will wear together, if you throw a fresh chain on worn sprockets your new chain will be flogged out again in no time so do it right the first time and replace it all in one hit!
How To Clean Your Motorcross Chain:
For the regular heavy duty chain you will need to do this often to make your chain last as long as possible. The best way for the heavy duty non O-ring chain is to remove it from the bike and wash it in degreaser or petrol and scrub it with a brush. There are also handy products like the Motul Chain Pack available which make life easier!
To remove a chain you need to find the joining link which will be the only link with an open ended clip on one side. You can remove this with a set of pliers, when putting the chain back on the bike make sure you replace the clip so the direction of the chain pulls against the closed end of the clip. If the direction of the chain is pulling against the open end there is more chance of the clip coming off and the chain turning into a lethal flying metal snake!
.jpg)
The goal is to degrease and remove all of the grit and grease trapped inside the rollers, depending on how dirty the chain is you may need to use a second batch of degreaser to make sure the chain is thoroughly cleaned. Then rinse with water to remove the cleaning chemical and either dry with compressed air, or shake the chain out and leave in the sun to dry quickly and prevent rust.
For the O-ring and X-ring chains it is best not to use harsh chemicals to clean the chain as it can dry out the rubber seals. All you need to do is wash your bike and then apply penetrating lubricant spray onto the chain afterwards which will prevent the chain from rusting and keep the rubber rings soft.
Tensioning:
Now your chain is clean you will want to set the tension as all chains will stretch with wear. As for how much slack the chain needs every bike will have a different amount of free play so consult your owners’ manual to find out what’s right for your machine.
It is best to have your bike sitting on a stand with the rear wheel off the ground, loosen the rear axle with a ring spanner or socket (avoid using a shifter as there is more chance of slipping and rounding the nut). Once the axle is loosened you will need to also loosen the lock nuts to your chain adjusters on either side of your swing arm.
From there you can check how much slack your chain has and where it needs to be by consulting your owners’ manual. To tension your chain in or out wind the adjustment bolts to tighten or loosen the chain to its desired point. You will need to tension both adjusters to keep the rear wheel straight, if you are unsure on how straight you have it, you can double check the locating lines on each tensioning block with the lines marked on the swing arm.
To get an accurate reading on these adjusters you can put tension on the chain by placing a rag on the rear sprocket and rolling the wheel back to wedge the rag in between the chain and rear sprocket. This will place tension on the chain and pull the adjusters in tight to give a true reading on how straight the wheel is sitting.
Once you are happy with your adjustment you can tighten your rear axle (keep the rag pulled into the rear sprocket as this will ensure the tension blocks are pressed firm against the adjusters) to the torque setting in your owners’ manual. Once your rear axle is done remove the rag and tighten the lock nuts on the chain adjusters making sure the adjusters are firm against the tension blocks.
.jpg)
Lubrication:
Once your chain is clean and adjusted you can then apply the lubricating grease, use recognised motorcycle chain grease as they have application spouts for easy use and quite often the grease will be a heavy, waxy consistency making it stick to the chain and not fling off all over the place.
Shake the can well, when you are ready spin the back wheel and spray the lubricant on the inside of the chain, aim to get the grease into the rollers in between the plates, anything on the outside won’t be lubricating much and will just attract dirt so try not to spray it all over your bike, especially your brakes! Be generous with the lubrication of the rollers though, think about the amount of times they spin every lap of a motocross track and lubricate accordingly!
Once everything is done up tight and lubricated spin the wheel and check the chains tension at a few different points of the chain to ensure you are happy with the tension and you are ready to hit the track!
Check Out Dirt Bike Chains And Sprockets At MXstore:
- Dirt Bike Chains
- Dirt Bike Sprockets
- D.I.D Chains
- EK Chains
- Pro Taper Chains
- Renthal Chains
- RHK Chains
- RK Chains
If you have any more questions regarding maintaining motorcycle chains or about bike prep, don’t hesitate to contact the friendly team at MXstore